В этой статье рассмотрим установку\настройку Cisco FirePower IPS сенсора на примере платформы Cisco ASA 5525-X (Failover Active\Standby) и Cisco Firepower Management Center for VMWare. Лицензии, какие будем использовать: Control + URL Filtering + Malware и аутентификацию через Active Directory (куда же без нее ;). Данная конфигурация позволяет обслуживать подключения, генерируемые ~500 активными пользователями, правда без SSL decrypt Policy (упирается в производительность сенсора).
Предлагаемая схема подключения:

Для первоначальной настройки сенсора подключаемся из консольной сессии ASA к модулю FirePower: session sfr console (for exit: Ctrl+Shift+6+x)
Default Login and Password for ASA SFR
asasfr login: admin Password: Admin123 |
Register the sensor to a Firepower Management Center:
You can register the sensor to a Firepower Management Center and use the Firepower Management Center to manage it. Note that registering the sensor to a Firepower Management Center disables on-sensor Firepower Services management capabilities.
When registering the sensor to a Firepower Management Center, a unique alphanumeric registration key is always required. In most cases, to register a sensor to a Firepower Management Center, you must provide the hostname or the IP address along with the registration key.
Service Policy Rules
access-list sfr_redirect extended permit ip any any

class-map sfr
 match access-list sfr_redirect

policy-map global_policy
 class sfr
 sfr fail-open !for inline mode
 sfr fail-open monitor-only ! for monitor mode only

service-policy global_policy global
Подготовка Active Directory для FirePower Management Center
Прежде чем переходить к настройке FirePower Management Center нам необходимо все спланировать — какие группы пользователей необходимы, какая аутентификация будет для них использоваться (Active or Passive), какие служебные учетные записи необходимо создать, OU и пр. Для примера, приведу структуру, к которой мы пришли: доступ в сеть Интернет для обычных серверов, для серверов с опубликованными сервисами, для пользователей с ОС Windows и учетными записями AD, для пользователей с ОС Linux\Mac OS и Active authentication; группы пользователей AD с полным или ограниченным доступом в сеть Интернет; сегменты сети без аутентификации вообще и полным доступом в Интернет; группы доверенных хостов, к которым есть полный доступ из всех сегментов сети и не требующих аутентификации.
Создадим учетную запись и группу безопасности для нее в ActiveDirectory для подключения и поиска по LDAP (System -> Integration -> Realms ):
s-cisco-ldap (член группы sg-cisco-ldap, с правом ввода «компьютера» в домен. если нет желания заморачиваться с выставлением необходимых прав для пользователя, ввести в домен можно и админской учеткой, а вот получать список пользователей и групп все же рекомендую ограниченной).

После успешной настройки Realm вы сможете получить список пользователей и групп с указанной OU:

Теперь мы сможем использовать группы пользователей AD в Access Control Policy Rules, но прежде давайте попробуем разобраться с полем Action — действие, которое необходимо выполнить при совпадении всех условий правила. Картинка для привлечения внимания:

Выглядит все вполне логично, но лично мне было сложно понять принципы и порядок исполнения. Проще, как мне кажется, когда есть практические примеры использования. FirePower предлагает следующие «действия» для ACR:

Trust — Allows the matching traffic to pass through the device without inspection
Allow — Allows the matching traffic to pass through the device. You can also inspect the traffic using an IPS policy, file policy or both
Monitor — Doesn’t affect traffic flow — only purpose is to log a connection event. Traffic matching this will result in a connection event and traffic will proceed down the rule set, potentially matching another rule or the default action
Block and Block with Reset — Deny traffic without further inspection. Block simply stops the traffic from passing while Block with Reset resets the connection
Interactive Block and Interactive Block with Reset — Allows users to bypass a website block by clicking through the warning page.
Создадим правило «Trusted-HOSTS» с действием «Trust» для прохождения трафика из внутренних сетей к внешним хостам, без инспекции:

На скриншоте видна вкладка «Zones», в которой мы задаем направление движения трафика, которое будет одним из условий срабатывания этого правила. В нашем примере есть 7 зон: 2 внутренние и 5 внешних (2 внутренних интерфейса на 2 двух устройствах и 3 внешних аплинка на 3-х устройствах). Направление из LAN в WAN.

На этой картинке мы видим непосредственно саму группу сетевых объектов «TRUSTED-HOSTS» (IP адреса и сети), трафик к которым не будет проходить инспекцию.
Далее, судя по схеме, следует располагать правила с действием «Block». Для примера создадим правило блокировки HTTP\HTTPS трафика к определенным ресурсам (категориям URLs):

Вкладка Zones у нас практически всегда одинаковая для всех правил, а вот во вкладке Networks уточним источник трафика (Source Networks).
Теперь обозначим порты\службы по которым будет отрабатывать это правило:

Как мне тут подсказали грамотные читатели 🙂 — правильнее, вместо Ports, будет использовать Applications:

Access Control Rule Web-Block-Users for Applications image 3
И выберем категории URLs, к которым будем блокировать доступ:

Во вкладке «Logging» соответственно включается логирование.
Ну и самое интересное, в плане возможностей, правило с действием «Allow«:

Во вкладке Users укажем группу Active Directory, члены которой и будут попадать под действие (Allow) этого правила.

В Inspection выбираемым Intrusion Policy и заранее созданную File Policy.
Для действия по умолчанию создадим правило Default-Block-Any-Local, в котором в качестве Source укажем все внутренние сети (RFC1918):

Для того, чтобы созданные правила (где используются группы Active Directory) успешно отрабатывали необходимо вести учет пользовательских сессий (должна работать аутентификация). Настроим ее:
Cisco FirePOWER User Agent – Use With the FirePOWER Management Console
Problem
FirePOWER Management Center, will give you a wealth of information on traffic/threats etc. Usually it will tell you what IP the offenders are on, but if you want to know what a USER is doing, then that means you have to look though logs see who had what IP, at what time etc.
So you can install the FirePOWER User Agent on a machine, (this can be a client machine, though I usually put it on a member server). You then tell the the user agent to monitor your active directory server(s) and it keeps a record of which user is where, which it reports back to the FMC for its dashboards and logs.
Note: This is for Version 6.0.0
You will need to create a user in your domain to query AD with, (just a member of domain users is fine). I typically use svc_firepower as the username.
Solution
Your first challenge is to find the software, you would think it would be with the firewalls or the appliance but no!

In the FMC > System > Integration >Identity Sources > User Agent > New Agent > Supply the IP of the server that you are going to install the agent on > OK > Save.

Cisco Firepower User Agent for Active Directory — Identity Source
On the DOMAIN CONTROLLER(S) that you will point the agent at, make sure WMI is open on the firewall

Cisco Firepower User Agent for Active Directory — Windows Firewall Rule for WMI
On the DOMAIN CONTROLLER(S) that you will point the agent at, run wmimgmt.msc > WMI Control Local > Properties > Security > Root > cimv2 > Security.

Cisco Firepower User Agent for Active Directory — WMI Control Local
Grant your firepower user Remote Enable > Apply > OK.

Cisco Firepower User Agent for Active Directory — Security settings for AD service account
On the DOMAIN CONTROLLER(S) that you will point the agent at, run comexp.msc > Console root > Computers > My Computer > Properties > COM Security > ‘Launch and Activation Permissions’ Section > Edit Limits.

Grant your FirePOWER account the Remote Launch and Remote Activation permissions > Apply > OK.

On the Default Domain Controllers Group Policy > Computer configuration >Policies > Windows Settings > Security Settings > Local Policies > User Rights Assignment > Manage Auditing and security log >Add in your FirePOWER user.
Note: Allow time for the policy to apply, (or run ‘gpupdate /force‘, or simply force the policy from the GPMC.msc console, (if your domain is 2012)).

On the server/machine that you want to install the agent on, run setup.exe (1), if you run setup.msi (2) then only the agent is installed and it will error if you try and launch it.

Open the agent and add in your domain controllers.

Note: Sometimes, you may have the following problem;
FirePOWER Agent – Real-Time Status ‘Unavailable’
Then add in the FMC Management details, go and have a coffee, and check everything has gone green.
Note: If managing FirePOWER ‘on-board’, (i.e. though the ASDM.) Enter the IP address of the SFR module instead!)

Finally ensure in the FirePOWER Management Center > Policies > Network Discovery > Users > Ensure all the methods are selected.

Then on the ‘Networks’ tab > Ensure that your rule has ‘Users’ selected.

Captive portal (Active Authentication)
Active Authentication asks for username/password at the browser to identify a user identity for allowing any connection. Browser authenticates user either by presenting authentication page or authenticates silently with NTLM authentication. NTLM uses the web browser to send and receive authentication information. Active Authentication uses various types to verify the identity of the user. Different types of Authentication are:
- HTTP Basic: In this method, the browser prompts for user credentials.
- NTLM: NTLM uses windows workstation credentials and negotiates it with Active directory using a web browser. You need to enable the NTLM authentication in the browser. User Authentication happens transparently without prompting credentials. It provides a single sign-on experience for users.
- HTTP Negotiate:In this type, the system tries to authenticate using NTLM, if it fails then the sensor will use HTTP Basic authentication type as a fallback method and will prompt a dialog box for user credentials.
- HTTP Response page: This is similar to HTTP basic type, however, here user is prompted to fill the authentication in an HTML form which can be customized.
Each browser has a specific way to enable the NTLM authentication and hence they follow browser guidelines in order to enable the NTLM authentication.
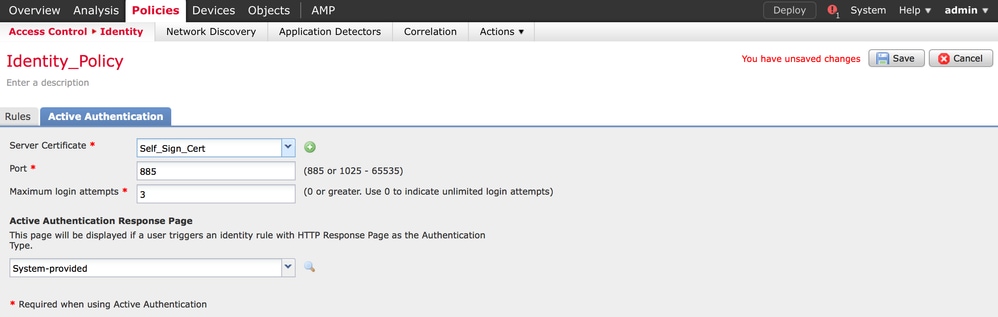
To securely share the credential with the routed sensor, you need to install either self-signed server certificate or publicly-signed server certificate in the identity policy.
Generate a simple self-signed certificate using openSSL -
Step 1.   Generate the Private key
  openssl genrsa -des3 -out server.key 2048
Step 2.   Generate Certificate Signing Request (CSR)
  openssl req -new -key server.key -out server.csr
Step 3.   Generate the self-signed Certificate.
  openssl x509 -req -days 3650 -sha256 -in server.csr -signkey server.key -out server.crt
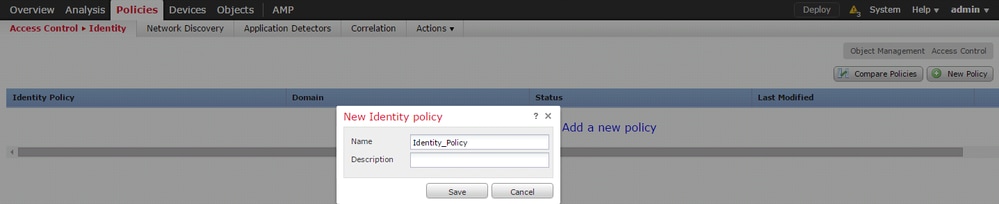
Navigate to Policies > Access Control > Identity. Click the Add Policy & give a name to policy and save it.
Navigate to Active Authentication tab & in the Server Certificate option, click the icon (+) and upload the certificate & private key which you generated in the previous step using openSSL.
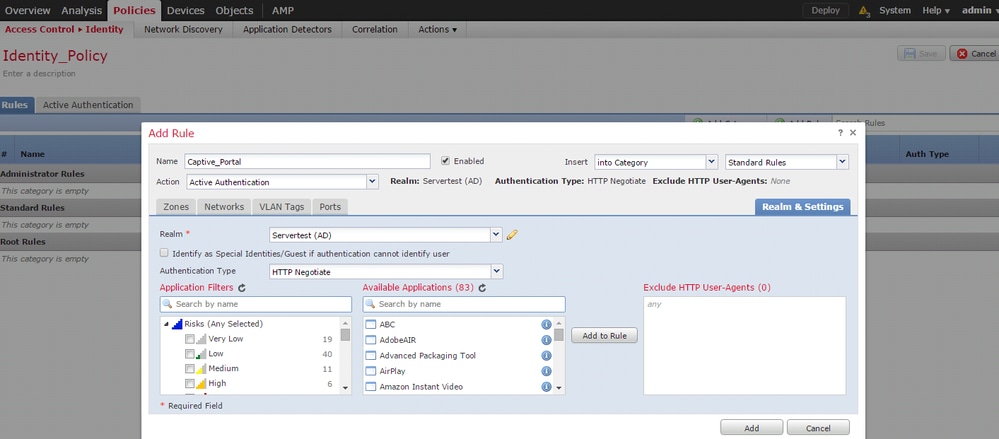
Now click the Add rule button & give a name to the Rule & choose the action as Active Authentication. Define the source/destination zone, source/destination network for which you want to enable the user authentication.
Select the Realm, which you have configured in the previous step and authentication type that best suits your environment.
ASA configuration for Captive Portal
For ASA Firepower module, Configure these commands on the ASA in order to configure the captive portal.
ASA(config)# captive-portal global port 885
Ensure that the server port, TCP 885 is configured in the port option of Identity policy’s Active Authentication tab.
In order to verify the active rules and their hit counts, run following command.
ASA# show asp table classify domain captive-portal
Note: Captive portal command is available in ASA version 9.5(2) and later.
Step 4.2 Single-Sign-On (Passive Authentication)
In passive authentication, when a domain user logins and is able to authenticate the AD, the Firepower User Agent polls the User-IP mapping details from the security logs of AD and shares this information with Firepower Management Center (FMC). FMC sends these details to the sensor in order to enforce the access control.
Click the Add rule button & give a name to the Rule & choose the Action as Passive Authentication. Define the source/destination zone, source/destination network for which you want to enable the user authentication.
Select the Realm which you have configured in the previous step and authentication type which best suites your environment, as shown in this image.
Here you can choose fall back method as Active authentication if passive authentication cannot identify the user identity.

Step 5. Configure the Access Control Policy
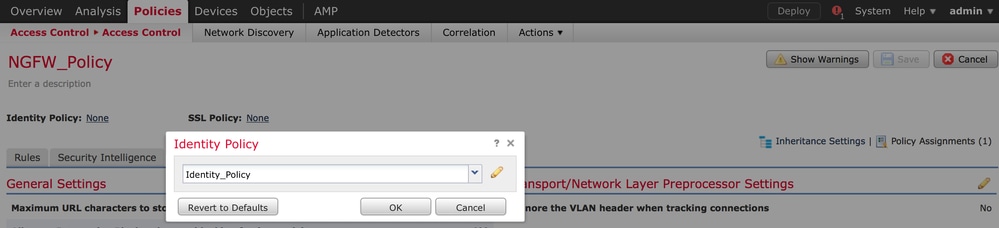
Navigate to Policies > Access Control > Create/Edit a Policy.
Click the Identity Policy (left-hand side upper corner), choose the Identify Policy that you have configured in the previous step and click the OK button, as shown in this image.
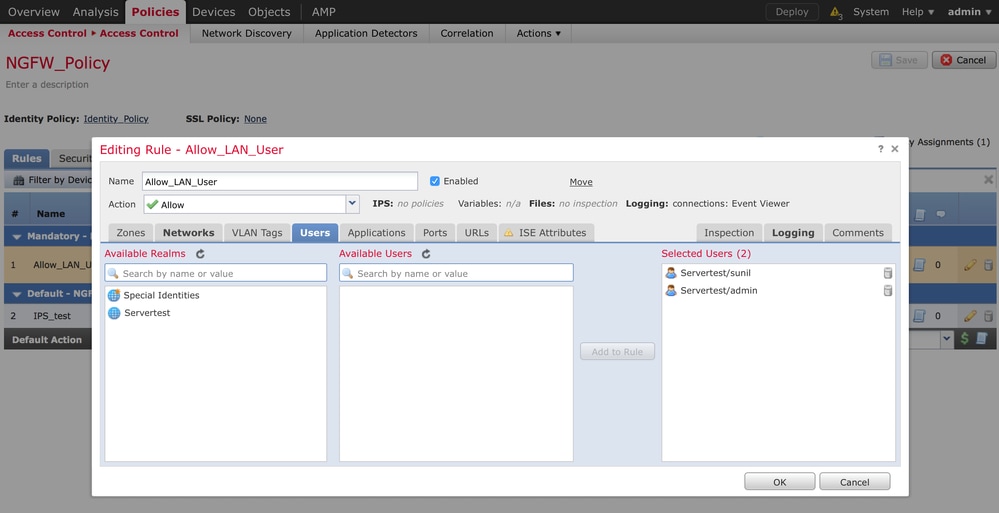
Click the Add rule button to add a new rule, navigate to Users and select the users for which access control rule will enforce, as shown in this image. Click the OK button and click Save button in order to save the changes.
Step 6. Deploy the Access Control Policy
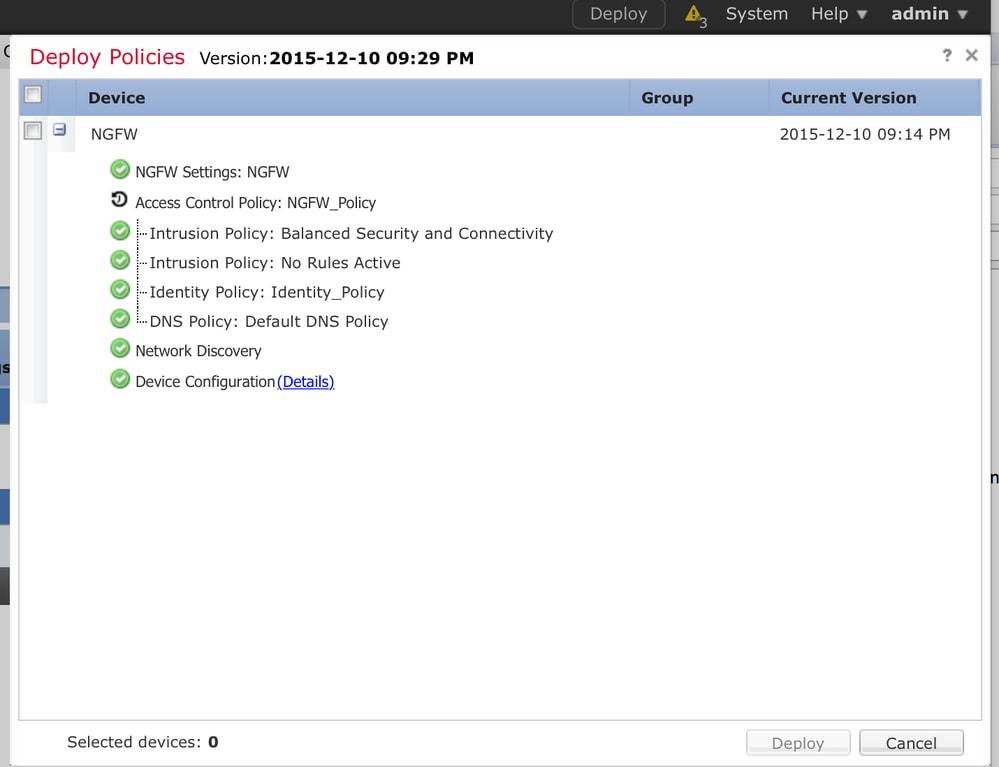
Navigate to Deploy option, choose the Device and click the Deploy option to push the configuration change to the sensor. Monitor the Deployment of policy from the Message Center Icon (icon between Deploy and System option) option and ensure that policy must apply successfully, as shown in this image.
Step 7. Monitor user events & Connections events
Currently active user sessions are available in the Analysis > Users > Users section.
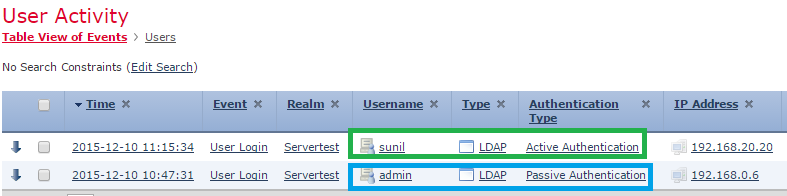
User Activity monitoring helps to figure out which user has associated with which IP address and how is user detected by the system either by active or passive authentication. Analysis > Users > User Activity
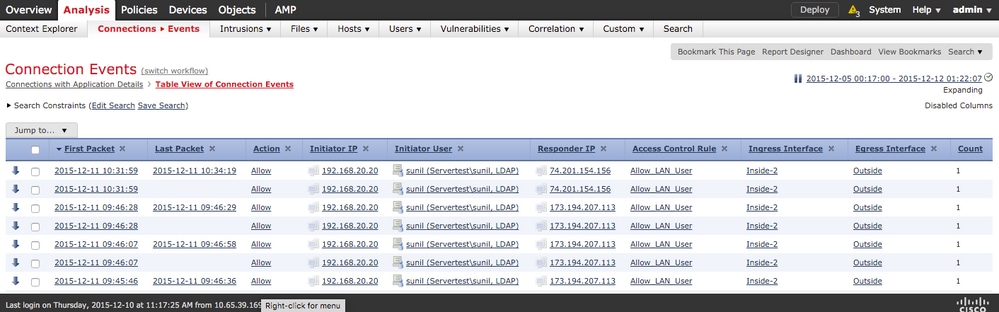
Navigate to Analysis > Connections > Events, to monitor the type of traffic being used by the user.
FirePower — пользовательские сессии
Иногда у пользователя исчезает доступ в Интернет, чаще всего — по причине «протухшей авторизации». В большинстве случаев это не доменные компьютеры с ОС Linux или Mac OS, но и Windows (доменными) это иногда случается. При этом пользователю выдается сообщение:
You are attempting to access a forbidden site.
Consult your system administrator for details.
Возникает это чаще всего из-за смены каких-то сетевых параметров \ или настроек учетной записи пользователя AD (членство в группах, OU и пр.)

Альтернативный способ диагностики через консоль FirePower сенсора (подключение через ssh на активный сенсор) и запускаем debug:
FirePower censor console>

system support firewall-engine-debug

Общее для всех ОС — заходим в FirePower Management и подгружаем список пользователей и групп AD ( System -> Integration -> Realms -> Download Now):
Далее для Windows — переходим Analysis -> Users -> Active Sessions и делаем Logout для всех(или давно не активных) сессий. После этого на компьютере пользователя запускаем CMD и в ней обновление групповых политик: gpupdate /force

Для Linux & Mac OS можно авторизоваться через браузер (желательно Chrome, на Safari не отрабатывает) с помощью активной аутентификации (ввод доменных учетных данных, логин без доменного имени) или через консольное приложение wget:
Авторизовываемся:
wget ya.ru —no-check-certificate —user=testersdev —ask-password —auth-no-challenge
Пароль для пользователя «testersdev»:
—2018-11-01 15:34:39— http://ya.ru/Распознаётся ya.ru (ya.ru)… 87.250.250.242, 2a02:6b8::2:242
Подключение к ya.ru (ya.ru)|87.250.250.242|:80… соединение установлено.HTTP-запрос отправлен. Ожидание ответа… 307 Proxy Redirect Адрес: https://fw.domain.ru:885/x.auth?s=OPS2Mxku9tBFYPtJzoBSw6EsLr0d%2FkxOpdA5TLIhlj8
ССЫЛКИ
Firepower Management Center Configuration Guide, Version 6.1
Firepower Management Center REST API Quick Start Guide, Version 6.2.3
Disable Service Module Monitoring on ASA to Avoid Unwanted Failover Events (SFR/CX/IPS/CSC)
Install and Configure a FirePOWER Services Module on an ASA Platform